
Traefik is an awesome simple little router made for the cloud. What does that mean? It means it will automatically route traffic to container just by specifying it in the container’s labels/definitions. So you’ll have Traefik running, and then you’ll start up a container specifying that it’s for “site.example.com”, and that’s all you have to do. Traefik talks with Docker/Kubernetes/etc, and keeps an updated list of sites. Never needs to restart to see new sites/containers. So your “site.example.com” container will start getting traffic as soon as it’s up.
- Want to load balance between multiple containers? Just set them to the same site.
- Want to send traffic to another server at a specific IP address? It can do that too.
- Want to bring up, take down, destroy containers all day, without having to touch Traefik’s configuration? That’s exactly how it works.
- Want to automatically get Let’s Encrypt certificates for your site, even wildcard ones? It can do that either by the
httpmethod, or by using your DNS provider to setup the needed records and get the certificate.
Done, and done.
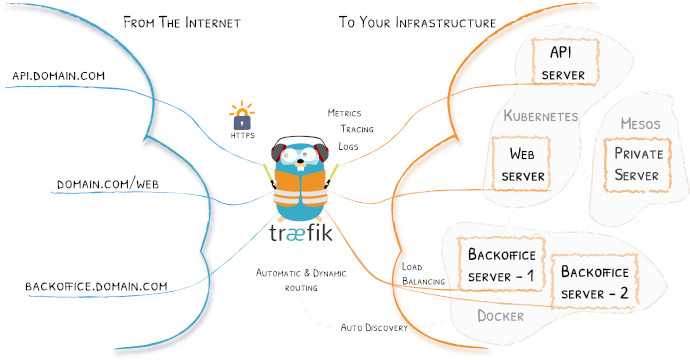
And Traefik can also work with Docker Swarm, Mesos, Kubernetes, and others.
What to Expect
We will be setting up Traefik with Docker Compose. We will be using the domains example.com and example.net as the domains, with Cloudflare as the DNS provider, though there’s a long list of others you can use
here, with the environment variables you’ll need to set for them.
How Traefik works
Traefik works by using the labels of a container to know where to send the data. This is the important part to know, or at least I think so, as it tripped me up when I was learning it. You don’t set the labels in the Traefik container, but rather in the container that you want to send the traffic to. And that can be in the same docker-compose.yml file that Traefik is in, or in a totally different one.
Say you wanted to send traffic to “mysite.example.com”. You would set the “traefik.frontend.rule” to the site’s url. In our docker-compose.yml:
  labels:
    - "traefik.frontend.rule=Host:mysite.example.com"
You’ll want to give Traefik its own network. In this case, we’ll give it traefik_proxy.
Then you’ll need to specify the backend for the site. This is what allows you to either separate or load balance services, and is controlled by traefik.backend. We’ll call this service mysite.
labels:
  - "traefik.backend=mysite"
  - "traefik.frontend.rule=Host:mysite.example.com"
If we want to load balance services, we only need to set traefik.backend to the same value for each. We can even give a weight to them but that’s beyond the scope of this article.
Warning: Make sure you set the traefik.backend to different values for different services. Failing to do this will mix the services, loading one and then the other when you got to the site.
Last, in the below example we are going to exclude services by default. This is the safer option, as not doing so would have Traefik automatically include all services and possibly route traffic to those that should not get any traffic.
This is set with traefik.enable=true. Simple:
labels:
  - "traefik.enable=true"
  - "traefik.backend=mysite"
  - "traefik.frontend.rule=Host:mysite.example.com"
And how does Traefik know how to do all of this magik? By connecting to the Docker socket to communicate with Docker. In the volumes section of the docker-compose.yml:
volumes:
  - /var/run/docker.sock:/var/run/docker.sock
Ok, let’s get on with the actual setup and docker-compose.yml files.
Setting it up
So obviously you’ll need to have Docker and Docker Compose installed. Follow the links if you need to do that.
Directing Traefik
Next, we need to setup Traefik’s personal network traefik_proxy.

Remember that this is what I am using in this example. You can call it easy_path if you want (If you do change it, just remember to replace it in the below documents/instructions)
docker network create traefik_proxy
Composing Traefik
Next we will get to the Compose file of Traefik. (It’s version 2.3 because version 3 I think is really for Swarm and version 2 allows you to control cpu and memory usage).
version: '2.3'
services:

  traefik:
    hostname: traefik
    image: traefik:latest
    restart: always
    networks:
      - default
      - traefik_proxy
    ports:
      - "80:80"
      - "443:443"
    environment:
      - [email protected]
      - CF_API_KEY=<your Global API key>
      - [email protected]
      - CLOUDFLARE_API_KEY=<your Global API key>
      - TZ="America/Denver"
    volumes:
      - /etc/localtime:/etc/localtime:ro
      - /var/run/docker.sock:/var/run/docker.sock
      - ./traefik:/etc/traefik
      - ./shared:/shared:ro

networks:
  traefik_proxy:
    external:
      name: traefik_proxy
  default:
    driver: bridge
As you can see, we have our traefik_proxy as an external network, as we created it. And you’ll notice the Cloudflare variables. This is for our wildcard SSL certificate(s). Again, you don’t have to use Cloudflare. See
here for others. For example, if you wanted to use Digitalocean’s DNS, you would set the above environment to
      environment:
        - DO_AUTH_TOKEN=<your Digital Ocean token>
        - TZ="America/Denver"
And you would change the below traefik config values of
[acme.dnsChallenge]
  provider = "cloudflare"
to
[acme.dnsChallenge]
  provider = "digitalocean"
Traefik’s config
Speaking of which, Traefik has it’s own config file. In the below, we have set it to show us a dashboard, redirect all domains to SSL, and set what our domains are.
Save this to traefik/traefik.toml
# debug = true
logLevel = "INFO" #DEBUG, INFO, WARN, ERROR, FATAL, PANIC

InsecureSkipVerify = true
defaultEntryPoints = ["https", "http"]

# WEB interface of Traefik - it will show web page with overview of frontend and backend configurations
[api]
  entryPoint = "traefik"
  dashboard = true
  address = ":8080"
  usersFile = "/shared/.htpasswd"

# Force HTTPS
[entryPoints]
  [entryPoints.http]
  address = ":80"
    [entryPoints.http.redirect]
    entryPoint = "https"
  [entryPoints.https]
  address = ":443"
  compress = true
    [entryPoints.https.tls]

[file]
  watch = true
  filename = "/etc/traefik/rules.toml"

# Let's encrypt configuration
[acme]
email = "[email protected]" #any email id will work
storage="/etc/traefik/acme/acme.json"
entryPoint = "https"
acmeLogging=true
onDemand = false #create certificate when container is created
[acme.dnsChallenge]
  provider = "cloudflare"
  delayBeforeCheck = 0
[[acme.domains]]
   main = "example.com"
[[acme.domains]]
   main = "*.example.com"
[[acme.domains]]
   main = "*.example.net"
[[acme.domains]]
   main = "example.net"

# Connection to docker host system (docker.sock)
[docker]
endpoint = "unix:///var/run/docker.sock"
domain = "example.com"
watch = true
# This will hide all docker containers that don't have explicitly
# set label to "enable"
exposedbydefault = false
Breaking down the above, first you’ll need to set you Let’s Encrypt email:
[acme]
email = "[email protected]" #any email id will work
Then set your domains for the Let’s Encrypt certificates. For example, if I were to use supertechcrew.com and mattbagley.me, I would set:
...
[acme]
 ...
 [[acme.domains]]
   main = "supertechcrew.com"
 [[acme.domains]]
   main = "*.supertechcrew.com"
 [[acme.domains]]
   main = "mattbagley.me"
 [[acme.domains]]
   main = "*.mattbagley.me"
 ....
[docker]
endpoint = "unix:///var/run/docker.sock"
domain = "supertechcrew.com"
Secure it
We will be setting up some services that need a password. This will be stored in the shared/.htpasswd file, and will be an regular htpasswd. You can generate this via the htpasswd command. There are websites that will do this, though be cautious of using one.
$ htpasswd -nb cooluser MyOwnPhrase
cooluser:$apr1$ZhEwpsIb$60JRXwScQxwDFzBpTwD9S1
Save this to shared/.htpasswd
Rules
Make an empty rules file called traefik/rules.toml. We will use this later.
Start it
Now to start it.
docker-compose up -d
And watch the logs that it started properly
docker-compose logs -f
It should say it’s getting the certificates. And if you go to your URL, it should say “404 not found”, as we haven’t set up anything for it to route to, yet.
On to the routing part.

Routing Traffic
To test our routing traffic with it, we will start up two containers and route traffic to them. This will also show you how to setup a service. In a separate directory, make this docker-compose.yml.
You’ll notice that we do not need to set a port. That’s because Traefik automatically routes traffic directly to the container. This both makes it simple to deploy service, but also avoids exposing the service on the host. It keeps it isolated, how a container should be.
On each service we will set the port with:
traefik.port=80
Save this in a new directory as docker-compose.yml
version: '2.2'
services:

  nginx:
    image: nginx
  networks:
    - traefik_proxy
    - default
  labels:
    - "traefik.enable=true"
    - "traefik.backend=example_backend"
    - "traefik.frontend.rule=Host:example.com"
    - "traefik.port=80"
    - "traefik.docker.network=traefik_proxy"
    - "traefik.frontend.headers.SSLRedirect=true"
    - "traefik.frontend.headers.STSSeconds=315360000"
    - "traefik.frontend.headers.browserXSSFilter=true"
    - "traefik.frontend.headers.contentTypeNosniff=true"
    - "traefik.frontend.headers.forceSTSHeader=true"
    - "traefik.frontend.headers.SSLHost=example.com"
    - "traefik.frontend.headers.STSIncludeSubdomains=true"
    - "traefik.frontend.headers.STSPreload=true"
    - "traefik.frontend.headers.frameDeny=true"

networks:
  traefik_proxy:
    external:
      name: traefik_proxy
Substitute example.com and example_backend with your own values.
Start it
docker-compose up
And you should now be able to go to the site you used for example.com
Routing to specific locations
Now that we can route in docker, what if we need to send traffic to a specific server or port? You remember that rules.toml file? It’s where we can set some static routes, if we need to.
In this file we will specify the frontend, or the domain Traefik looks for, and the backend, where it sends it to.
[backends]

  [backends.NAME]
    [backends.NAME.servers]
      [backends.NAME.servers.NAME1]
        url = "http://10.11.12.1:5000"
        weight = 0
  [backends.another]
    [backends.another.servers]
      [backends.another.servers.another1]
        url = "https://10.11.11.1:9000"
        weight = 0


[frontends]

  [frontends.NAME]
    backend = "NAME"
    passHostHeader = true
    [frontends.NAME.routes]
      [frontends.NAME.routes.NAME1]
        rule = "Host:site.example.com"
  [frontends.another]
    backend = "another"
    passHostHeader = true
    [frontends.another.routes]
      [frontends.another.routes.another1]
        rule = "Host:another.example.com"
As you can see, we have two frontends/backends in here, NAME and another. The name is only for traefik to know, and doesn’t relate directly to the site.
We set the domain with the rule option
rule = "Host:another.example.com"
and then we tell it where to go with the backend that uses the same name as the frontend
url = "http://10.11.11.1:9000"
And so per the above configuration, the below sites will go to the following location
site.example.com -> http://10.11.12.1:5000
another.example.com -> https://10.11.11.1:9000
Load balancing
Load balancing is easy to set up. We do the same as the above, just multiple apps. And we will use the whoami image to show which one is loading.
version: '2.2'
services:

  whoami:
    image: jwilder/whoami
    networks:
      - traefik_proxy
      - default
    labels:
      - "traefik.enable=true"
      - "traefik.backend=whoami_backend"
      - "traefik.frontend.rule=Host:whoami.skeletor.alaskacrew.co"
      - "traefik.port=8000"
      - "traefik.docker.network=traefik_proxy"
      - "traefik.frontend.headers.SSLRedirect=true"
      - "traefik.frontend.headers.STSSeconds=315360000"
      - "traefik.frontend.headers.browserXSSFilter=true"
      - "traefik.frontend.headers.contentTypeNosniff=true"
      - "traefik.frontend.headers.forceSTSHeader=true"
      - "traefik.frontend.headers.SSLHost=example.com"
      - "traefik.frontend.headers.STSIncludeSubdomains=true"
      - "traefik.frontend.headers.STSPreload=true"
      - "traefik.frontend.headers.frameDeny=true"

networks:
  traefik_proxy:
    external:
      name: traefik_proxy
Start it
docker-compose up -d
This will only start one container. We will add more in a moment, but first let’s make sure it’s working:
docker-compose logs -f

whoami_1  | Listening on :8000
whoami_1  | I'm 576dd5ec6234
Now that it’s working, we’ll start a few more using the scale option.
docker-compose up --scale whoami=5
And each time we load the page we see a different container is loading it.
Starting whoami_whoami_1 ... done
Creating whoami_whoami_2 ... done
Creating whoami_whoami_3 ... done
Creating whoami_whoami_4 ... done
Creating whoami_whoami_5 ... done
Attaching to whoami_whoami_1, whoami_whoami_3, whoami_whoami_4, whoami_whoami_2, whoami_whoami_5
whoami_3  | Listening on :8000
whoami_2  | Listening on :8000
whoami_1  | Listening on :8000
whoami_5  | Listening on :8000
whoami_4  | Listening on :8000
whoami_1  | I'm 576dd5ec6234
whoami_2  | I'm 38d651020ae8
whoami_3  | I'm c6c74cb3316e
whoami_4  | I'm 6a8a1495f846
whoami_5  | I'm 45758fc44ad8
whoami_1  | I'm 576dd5ec6234
And there you have it. A very simple way to load balance a service.
Dashboard
Traefik has a built in Dashboard that shows information about the services, as well as traffic. The service listens on port 8080, but we don’t need to expose this host. Instead, we will set the labels on the Traefik container itself.
So we will add a labels section to our previous docker-compose.yml. I made this separate so as not to add too much at once.
The site in here will be traefik.example.com and it will be protected by the user/password in shared/.htpasswd.
Here is the complete configuration, though all you really need to add is the labels section. Remember to substitute the domain you want for the below traefik.frontend.rule=Host:traefik.example.com.
version: '2.3'
services:

  traefik:
    hostname: traefik
    image: traefik:latest
    restart: always
    networks:
      - default
      - traefik_proxy
    ports:
      - "80:80"
      - "443:443"
    environment:
      - [email protected]
      - CF_API_KEY=<your api key>
      - [email protected]
      - CLOUDFLARE_API_KEY=<your api key>
      - TZ="America/Denver"
    labels:
      - "traefik.enable=true"
      - "traefik.backend=traefik"
      - "traefik.frontend.rule=Host:traefik.example.com"
      - "traefik.frontend.auth.basic.usersFile=/shared/.htpasswd"
      - "traefik.port=8080"
      - "traefik.docker.network=traefik_proxy"
      - "traefik.frontend.headers.SSLRedirect=true"
      - "traefik.frontend.headers.STSSeconds=315360000"
      - "traefik.frontend.headers.browserXSSFilter=true"
      - "traefik.frontend.headers.contentTypeNosniff=true"
      - "traefik.frontend.headers.forceSTSHeader=true"
      - "traefik.frontend.headers.SSLHost=example.com"
      - "traefik.frontend.headers.STSIncludeSubdomains=true"
      - "traefik.frontend.headers.STSPreload=true"
      - "traefik.frontend.headers.frameDeny=true"
    volumes:
      - /etc/localtime:/etc/localtime:ro
      - /var/run/docker.sock:/var/run/docker.sock
      - ./traefik:/etc/traefik
      - /docker/shared:/shared:ro

networks:
  traefik_proxy:
    external:
      name: traefik_proxy
  default:
    driver: bridge
Once you’ve done that, fire up the Docker compose for it, and then go to what you set for traefik.example.com. Once you login, you’ll see what service Traefik is routing, as well as details about the traffic.
Conclusion
Traefik has a lot of wonderful features, powerful yet simple. For me it’s really been a “set and forget” sort of setup. Happy routing.